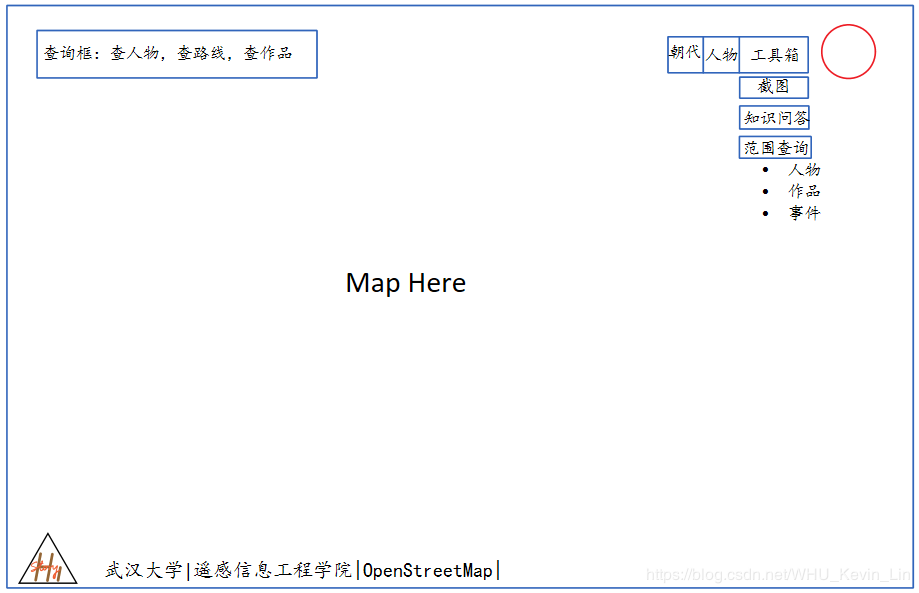
设计目标 创建项目 修改文件夹结构 修改代码 运行 设计目标 利用Vue的特性,结合Openlayers 5搭建一个单页地图应用。布局草图如图1所示,页面的主体为地图,在地图上添加查询框、工具栏、信息栏等内容。
创建项目 安装Vue CLI 3
1 $ npm install -g @vue/cli
创建Vue项目,可以使用命令行创建,并在其中配置插件、依赖等
也可以使用GUI创建,按照提示来即可
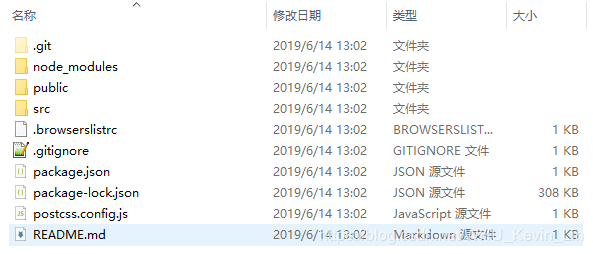
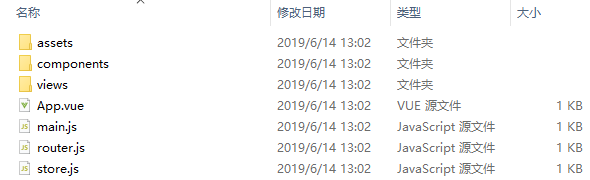
修改文件夹结构 创建后的文档结构如图2所示,主要的代码位于/src文件夹中,该文件夹的格式如图3所示
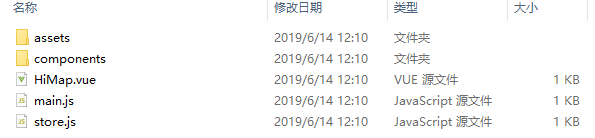
由于主体只有一个地图,功能全都体现在地图上的对话框,不需要使用多页面跳转的功能,因此可以放弃vue-router,使用模块化开发,搭建地图。首先将App.vue文件改名为HiMap.vue,然后删掉/views、/components/HelloWorld.vue、router.js,在/src/components中添加名为MainMap.vue的文件。修改后的/src文件夹结构如图4所示。
修改代码 详细内容如代码所示。
main.js
1
2
3
4
5
6
7
8
9
10
11
import Vue from 'vue' import HiMap from './HiMap.vue' import store from './store' Vue .config .productionTip = false new Vue ({ store, render : function (h ) { return h (HiMap ) } }).$mount('#app' )
HiMap.vue
1
2
3
4
5
6
7
8
9
10
11
12
13
14
15
16
17
18
19
20
21
22
23
24
25
26
27
28
29
30
<template> <div id="app"> <main-map></main-map> </div> </template> <script> // Map import MainMap from './components/MainMap.vue'; export default { name: 'HiMap', components: { MainMap } } </script> <style> #app { font-family: 'Avenir', Helvetica, Arial, sans-serif; -webkit-font-smoothing: antialiased; -moz-osx-font-smoothing: grayscale; text-align: center; color: #2c3e50; } html, body, div { margin: 0; } </style>
/components/MainMap.vue
1
2
3
4
5
6
7
8
9
10
11
12
13
14
15
16
17
18
19
20
21
22
23
24
25
26
27
28
29
30
31
32
33
34
35
36
37
38
39
40
41
42
43
44
45
46
47
48
49
50
51
52
53
54
55
56
57
58
59
60
61
62
63
64
65
66
67
68
69
70
71
72
73
74
75
76
77
78
79
80
81
<template> <div id="map" :style="MapStyle"></div> </template> <script> // Openlayers based modules import 'ol/ol.css'; import {Map, View} from 'ol'; import TileLayer from 'ol/layer/Tile'; import OSM from 'ol/source/OSM'; // Map Control import {defaults} from 'ol/control' export default { name: 'MainMap', data() { return { Map: {}, View: {}, Layers: [], MapStyle: { height: innerHeight + 'px', width: innerWidth + 'px' } } }, created() { const self = this; onresize = e => { let win = e.currentTarget; self.MapStyle.height = win.innerHeight + 'px'; self.MapStyle.width = win.innerWidth + 'px'; } }, mounted() { const self = this; // View const center = [12175093.67465372, 4209022.808896985]; const zoom = 4; const projecton = 'EPSG:3857'; self.View = new View({ center: center, zoom: zoom, projecton: projecton, }); // Layers const osmLayer = new TileLayer({ source: new OSM(), opacity: 1 }); self.Layers.push(osmLayer); // Map self.Map = new Map({ target: 'map', view: self.View, layers: self.Layers, controls: defaults({ attribution: false, rotate: false, zoom: false }), }); self.map.on('click', event => { console.log('(' + event.coordinate.toString() + ') ' + event.map.getView().getZoom()); }); }, } </script> <style scoped> </style>
运行 在命令行输入如下命令,即可编译运行,之后在浏览器中打开即可。
1
2
cd hi-story npm run serve
或者使用vue ui命令在浏览器中打开GUI,运行项目。
基本地图页面搭建完成: