使用国内镜像提升安装速度 运行第一个应用 打包 - 获取安装包 使用国内镜像提升安装速度 安装Electron时,可以选择安装在工程目录下或全局目录下,全局的安装可以减少每次创建新项目的安装量,而本地化安装(安装在工程目录下)可以明确使用的Electron版本。
使用npm安装Electron的命令如下所示:
1
2
npm i electron -D # 本地化安装 npm i electron -g # 全局安装
直接使用npm安装时,程序会自动调用脚本install.js从 https://github.com/electron/electron/releases 中下载Electron的二进制包,若访问GitHub的速度较慢,该过程可能会持续很久。
为了提升这一步骤的安装速度,可以使用淘宝提供的npm镜像进行安装,指定镜像路径通过配置环境变量来实现,在powershell中设置环境变量的过程如下所示:
1 $ env :ELECTRON_MIRROR="https://cdn.npm.taobao.org/dist/electron/"
或
1
2
$ env :ELECTRON_MIRROR="https://npm.taobao.org/mirrors/electron/" $ env :ELECTRON_CUSTOM_DIR="{{ version }}"
设置完成后,执行Electron的安装命令,即可加快安装速度。(直接使用cnpm安装可以省略配置环境变量,同样使用了淘宝提供的国内镜像)
运行第一个应用 Electron安装完成后,在根目录下创建三个文件:
1
2
3
|- main.js |- package.json |- index.html
文件的内容分别为:
package.json
1
2
3
4
5
6
7
8
9
10
11
12
13
14
15
16
{ "name" : "hello-electron" , "version" : "1.0.0" , "description" : "" , "main" : "main.js" , "scripts" : { "start" : "electron ." , "test" : "echo \"Error: no test specified\" && exit 1" } , "keywords" : [ ] , "author" : "" , "license" : "ISC" , "devDependencies" : { "electron" : "^10.1.1" } }
main.js
1
2
3
4
5
6
7
8
9
10
11
12
13
14
15
16
17
18
19
20
21
22
23
24
25
26
27
const { app, BrowserWindow } = require ('electron' );function cerateWindow ( const win = new BrowserWindow ({ width : 800 , height : 600 , webPreferences : { nodeIntegration : true } }); win.loadFile ('index.html' ); }; app.whenReady ().then (cerateWindow); app.on ('window-all-closed' , () => { if (process.platform !== 'darwin' ) { app.quit (); } }); app.on ('activate' , () => { if (BrowserWindow .getAllWindows ().length == 0 ) { cerateWindow (); } });
index.html
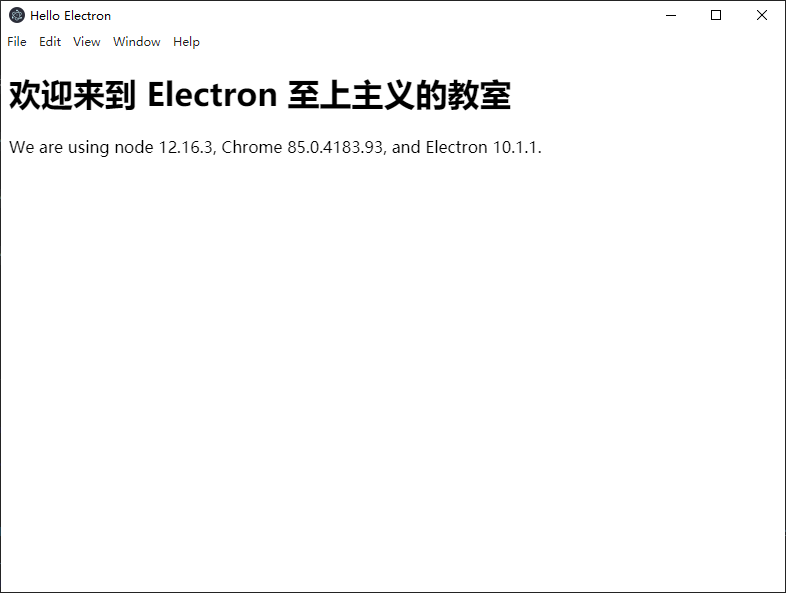
1
2
3
4
5
6
7
8
9
10
11
12
13
14
15
16
17
18
19
20
21
22
23
24
25
<!DOCTYPE html > <html lang ="en" > <head > <meta charset ="UTF-8" > <meta name ="viewport" content ="width=device-width, initial-scale=1.0" > <meta http-equiv ="Content-Security-Policy" content ="script-src 'self' 'unsafe-inline';" /> <title > Hello Electron</title > </head > <body > <h1 > 欢迎来到 Electron 至上主义的教室</h1 > We are using node <script > document .write (process.versions .node ) </script > , Chrome <script > document .write (process.versions .chrome ) </script > , and Electron <script > document .write (process.versions .electron ) </script > .</body > </html >
在命令行中运行:
若安装及书写过程没有出错,程序将自动弹出软件窗口(如下所示)。
打包 - 获取安装包 如何将编译好的软件打包生成软件安装包?需要用到electron-builder,安装的命令如下所示。
1 npm i electron-builder -D
接着在根目录下创建文件electron-builder.yml,写入如下内容:
1
2
3
4
5
6
7
nsis: oneClick: false allowToChangeInstallationDirectory: true createDesktopShortcut: true runAfterFinish: true deleteAppDataOnUninstall: true artifactName: '安装${productName}-v${version}.${ext}'
参考:https://www.electron.build/configuration/nsis
在package.json的script中添加pack:win命令:
1 "pack:win" : "electron-builder -w"
参考:https://www.electron.build/cli
运行npm run pack:win,执行打包程序,打包完成后,在根目录下生成dist文件夹,里面包含了安装包和未解压的软件包。