把图片窗口封装成一个控件 布局设计 图片显示窗口控件 选择侧边栏和信息栏的控件 侧边栏:QTreeView还是QTreeWidget? 信息栏 动态调整控件位置大小 窗口大小随屏幕分辨率变化 侧边栏 初始化侧边栏 显示文件夹下所有图片 侧边栏的点击事件 底部信息栏 在之前的设计中,我们直接在centralWidget中拖了一个QLabel作为显示图像的控件,所有的事件是基于主窗体的。当我们需要加入一些额外的窗体控件时,比如说底部的信息栏,侧边栏列表,就会想到要将几个部分分开来,保持其独立性。这篇文章记录了图片浏览软件优化的过程,为后续将其升级成图片处理软件做准备。包括一些控件的封装、设计、组件通信的内容。
把图片窗口封装成一个控件 首先把centralWidget中的label控件删除,接着在工程中创建一个类,命名为ImageViewer,基类是QWidget。然后将图像显示、鼠标事件、调整尺寸事件的函数以及相关的成员变量移动过来(并根据报错信息进行一定的修改),如下所示:
1 2 3 4 5 6 7 8 9 10 11 12 13 14 15 16 17 18 19 20 21 22 23 24 25 26 27 28 29 30 31 32 33 34 35 #pragma once #include <QWidget> #include <opencv2/opencv.hpp> #include <QLabel> #include <QResizeEvent> #include <QWheelEvent> #include <QMouseEvent> #include "Transform.h" class ImageViewer : public QWidget { public : ImageViewer (QWidget* parent = Q_NULLPTR); void showImage (const cv::Mat& img) void showImage (const cv::Mat& img, cv::Rect imgRect) protected : void resizeEvent (QResizeEvent* evt) void wheelEvent (QWheelEvent* evt) void mouseDoubleClickEvent (QMouseEvent* evt) void mousePressEvent (QMouseEvent* evt) void mouseMoveEvent (QMouseEvent* evt) void mouseReleaseEvent (QMouseEvent* evt) private : QLabel* mLabel; cv::Mat mImg; cv::Rect mRect; double msX, msY, meX, meY; };
由于之前的QLabel是通过拖动添加,直接通过ui变量可以获取,而改动后该变量无法直接获取,因此需要采用代码的方式添加(当然通过参数传递进来也可以,但是那样就显得很蠢)。将构造函数中的和QLabel相关的语句进行如下修改:
1 2 3 4 5 6 7 8 9 10 QString mainLabelName ("main_label" ) ;this ->mLabel = ui.centralWidget->findChild <QLabel*>(mainLabelName);if (!this ->mLabel){ qFatal (QString ("QLabel [%1] not found!" ).arg (mainLabelName).toLocal8Bit ()); } this ->mLabel = new QLabel (this );
尺寸调整事件:不需要考虑到其他窗口控件,只需要占满当前控件即可。
1 2 3 4 5 6 7 8 9 10 11 12 13 14 15 16 17 18 19 20 21 22 void ImageViewer::resizeEvent (QResizeEvent* evt) QSize winSize = this ->size (), menuSize = ui.menuBar->size (), statusSize = ui.statusBar->size (); int labelHeight = winSize.height () - menuSize.height () - statusSize.height (), labelWidth = winSize.width (); } void ImageViewer::resizeEvent (QResizeEvent* evt) QSize winSize = this ->size (); int labelHeight = winSize.height (), labelWidth = winSize.width (); }
添加两个函数接口,用于打开图片:
1 2 3 4 5 6 7 8 9 10 11 12 13 14 15 16 17 18 19 20 21 22 23 24 25 26 27 28 29 30 31 32 33 34 35 36 37 38 39 40 41 42 43 44 void openImage (const cv::Mat& img) void openImage (QString imagePath) void ImageViewer::openImage (const cv::Mat& img) if (!img.data) { qWarning () << "ImageViewer::openImage - Mat is Empty" ; return ; } this ->mImg = img.clone (); qInfo () << QString::fromLocal8Bit ("ImageViewer::openImage - 图像尺寸:width=%1px, height=%2px" ) .arg (this ->mImg.cols) .arg (this ->mImg.rows); this ->mRect = Transform::calcImageRect (this ->mImg, cv::Size (this ->mLabel->width (), this ->mLabel->height ())); this ->showImage (this ->mImg, this ->mRect); } void ImageViewer::openImage (QString imagePath) qInfo () << QString::fromLocal8Bit ("ImageViewer::openImage - 打开图像 (%1)" ).arg (imagePath); this ->mImg = cv::imread (imagePath.toLocal8Bit ().toStdString ()); if (!this ->mImg.data) { qWarning () << QString ("ImageViewer::openImage - Read image failed! [%1]" ) .arg (imagePath); return ; } qInfo () << QString::fromLocal8Bit ("ImageViewer::openImage - 图像尺寸:width=%1px, height=%2px" ) .arg (this ->mImg.cols) .arg (this ->mImg.rows); this ->mRect = Transform::calcImageRect (this ->mImg, cv::Size (this ->mLabel->width (), this ->mLabel->height ())); this ->showImage (this ->mImg, this ->mRect); }
布局设计 计划在软件主界面设置三个控件:图片窗口,侧边栏,信息栏,通过纯代码的方式添加。添加时使用new进行初始化,初始化时将父组件作为参数传入,即可实现添加子组件的效果。这些控件的显示、位置、大小全部通过变量控制。
图片显示窗口控件 首先在窗体类的头文件中引入我们自建的类#include "ImageViewer.h",接着添加成员变量ImageViewer* iViewer;
初始化成员变量并添加到中心控件的布局中
1 2 this ->iViewer = new ImageViewer (ui.centralWidget);
修改打开图像事件的响应函数:
1
2
3
4
5
6
7
8
9
10
11
12
13
14
15
16
17
18
void KvImage::on_action_open_image_triggered () QString caption = QString::fromLocal8Bit ("选择一个文件打开" ); QString dir = "" ; QString filter ("Image (*.png *.jpg *.jpeg *.tif *.bmp)" ) ; QString fileName = QFileDialog::getOpenFileName ( this , caption, dir, filter ); if (fileName.isEmpty ()) { qWarning () << QString::fromLocal8Bit ("KvImage::on_action_open_image_triggered - 未选择图片路径" ); return ; } this ->iViewer->openImage (fileName); }
选择侧边栏和信息栏的控件 参考自:doingself.github.io
QTreeWidget是QTreeView的子类。Qt中QTreeWidget比QTreeView更简单,但没有QTreeView那么灵活(QTreeWidget封装的和MFC的CTreeCtrl很类似,没有mvc的特点)。
因此决定使用QTreeView,在KvImage.h中创建成员变量:
初始化:
1 2 this ->mSideBar = new QTreeView (ui.centralWidget);
信息栏 信息栏使用QTextBrowser,继承自QTextEdit:
初始化
1 2 this ->mInfoBar = new QTextBrowser (ui.centralWidget);
动态调整控件位置大小 布局设计的思路是:侧边栏占左侧,高度与中心控件一至,信息栏占底部,宽度为中心控件减去侧边栏的宽度,其余部分为图片窗口。
在窗体类中添加变量用来记录各个控件的位置和大小:
1 2 3 4 5 6 bool sideBarVisible, infoBarVisible; int sideBarWidth, infoBarHeight;
在构造函数中初始化变量:
1 2 3 4 this ->infoBarVisible = this ->sideBarVisible = true ;this ->sideBarWidth = 100 ;this ->infoBarHeight = 100 ;
设置成员函数来控制控件尺寸:
1
2
3
4
5
6
7
8
9
10
11
12
13
14
15
16
17
18
19
20
21
22
23
24
25
26
27
28
29
30
31
32
33
34
35
36
37
38
39
40
41
42
43
44
45
void KvImage::refreshLayout () qDebug () << "KvImage::refreshLayout()" ; QSize cSize = ui.centralWidget->size (); int cw, ch; cw = cSize.width (); ch = cSize.height (); QRect imgRect, sideRect, infoRect; sideRect.setX (0 ); sideRect.setY (0 ); sideRect.setWidth (this ->sideBarVisible ? this ->sideBarWidth : 0 ); sideRect.setHeight (ch); infoRect.setX (sideRect.width ()); if (this ->infoBarVisible) { infoRect.setY (ch - this ->infoBarHeight); infoRect.setHeight (ch * this ->infoBarHeight); } else { infoRect.setY (ch); infoRect.setHeight (0 ); } infoRect.setWidth (cw - sideRect.width ()); imgRect.setX (sideRect.width ()); imgRect.setY (0 ); imgRect.setWidth (cw - sideRect.width ()); imgRect.setHeight (ch - infoRect.height ()); this ->iViewer->setGeometry (imgRect); this ->mInfoBar->setGeometry (infoRect); this ->iViewer->setGeometry (imgRect); }
修改调整尺寸事件的函数:
1
2
3
4
void KvImage::resizeEvent (QResizeEvent* evt) this ->refreshLayout (); }
在初始化各控件之后,更新布局:
1 2 3 4 5 6 KvImage::KvImage (QWidget* parent) : QMainWindow (parent) { this ->refreshLayout (); }
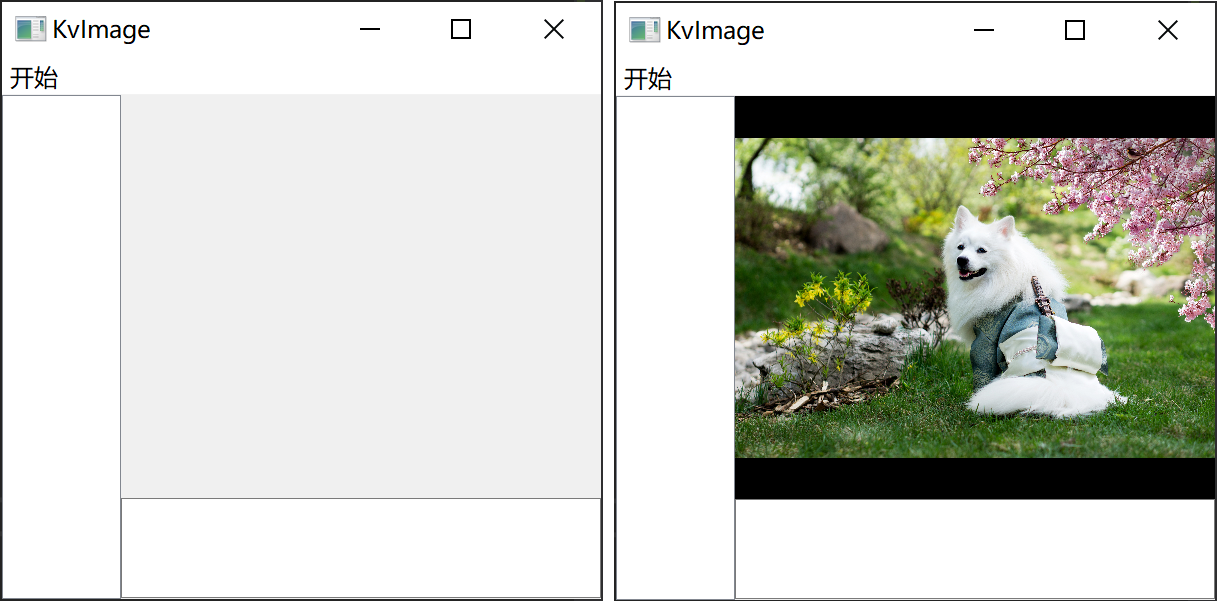
运行程序,可以看到效果:
窗口大小随屏幕分辨率变化 由于窗口控件数值一开始写死,在遇到不同分辨率屏幕时显示效果不一致。希望通过初始化窗口时屏幕的分辨率来设定窗口尺寸,例如占宽60,占高80这样,因此需要首先获取到屏幕的实际宽高,再相应地调整整个窗体的尺寸,以及各个控件的尺寸。
1 2 3 4 5 6 7 8 9 10 11 12 13 14 15 16 17 QDesktopWidget* desktopWidget = QApplication::desktop (); QRect deskRect = desktopWidget->availableGeometry (); int deskHeight, deskWidth;deskHeight = deskRect.height (); deskWidth = deskRect.width (); int winHeight, winWidth;winHeight = deskHeight * 0.8 ; winWidth = deskWidth * 0.8 ; this ->setGeometry (deskWidth / 2 - winWidth / 2 , deskHeight / 2 - winHeight / 2 , winWidth, winHeight);this ->infoBarVisible = this ->sideBarVisible = true ;this ->sideBarWidth = winWidth * 0.2 ;this ->infoBarHeight = winHeight * 0.2 ;this ->sideBarWidth = this ->sideBarWidth > 350 ? 350 : this ->sideBarWidth;this ->infoBarHeight = this ->infoBarHeight > 300 ? 300 : this ->infoBarHeight;
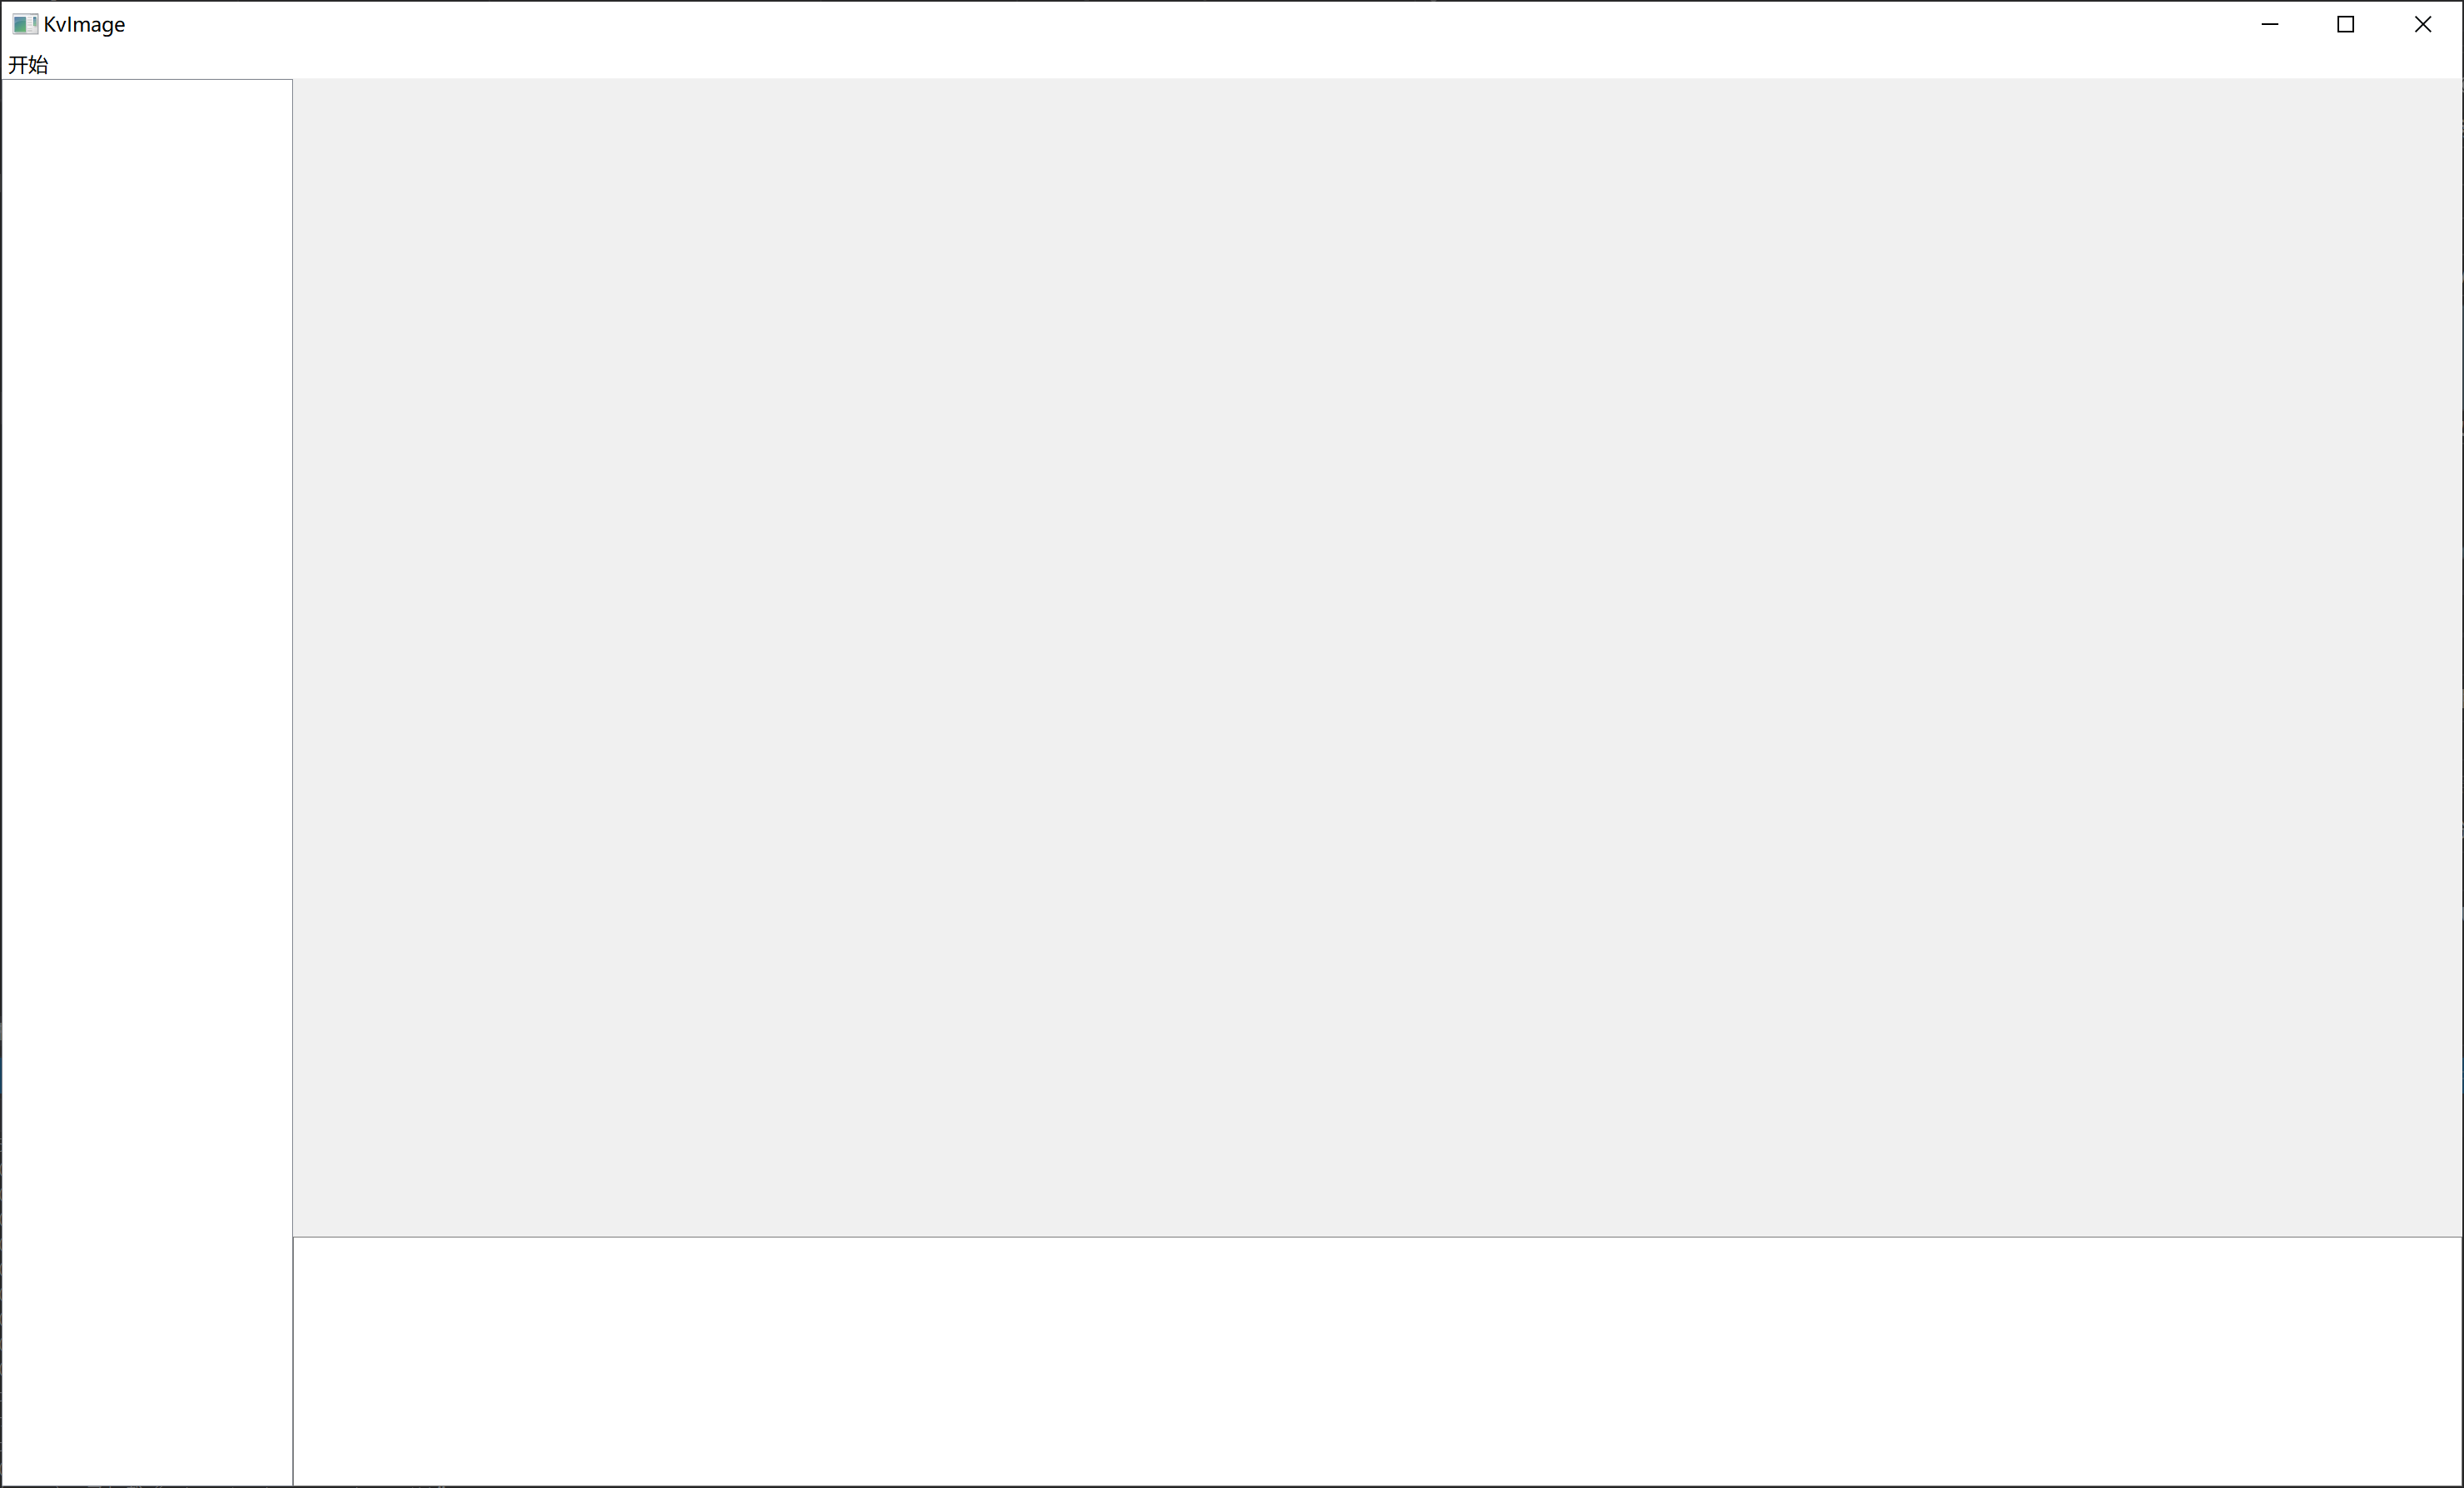
这样初始化时就可控多了,调了一个相对舒适的布局:
侧边栏
官方文档:QTreeView
使用总结:QTreeView使用总结—序
侧边栏QTreeView的基础设置和内容填充可以参考以下的代码(from blog.csdn.net/dpsying )
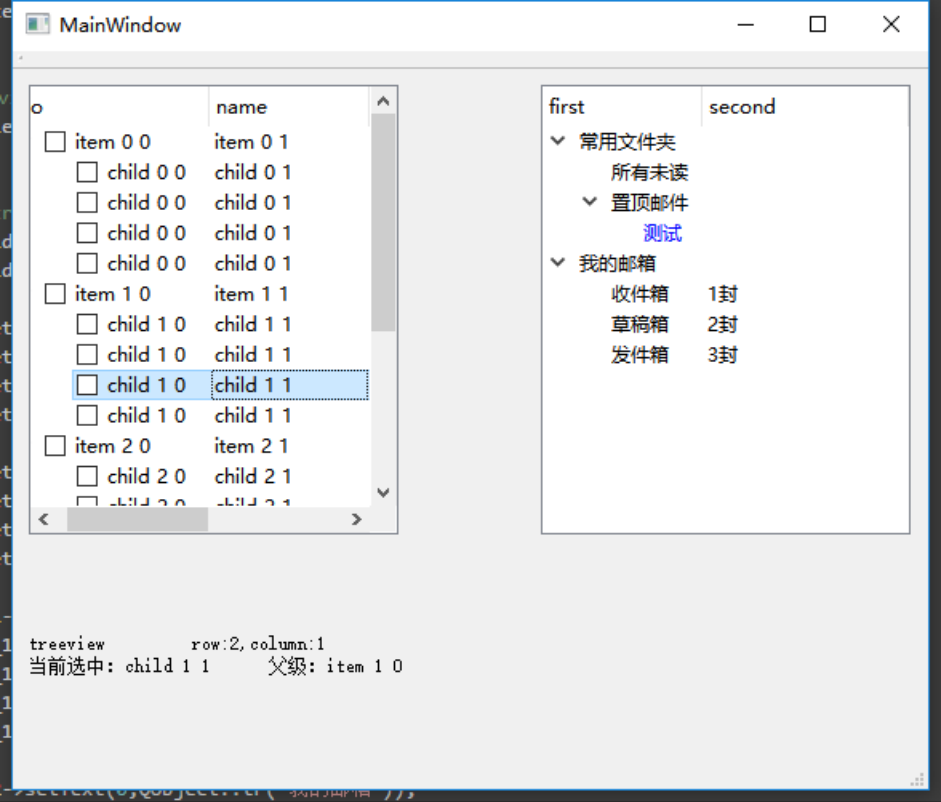
1 2 3 4 5 6 7 8 9 10 11 12 13 14 15 16 17 18 19 20 21 22 23 24 25 26 27 28 29 30 31 32 33 34 35 36 37 38 39 40 41 42 43 44 45 46 47 48 49 50 51 52 53 54 55 56 57 58 59 60 this ->mSideBar->setEditTriggers (QTreeView::NoEditTriggers); this ->mSideBar->setSelectionBehavior (QTreeView::SelectRows); this ->mSideBar->setSelectionMode (QTreeView::SingleSelection); this ->mSideBar->setAlternatingRowColors (true ); this ->mSideBar->setFocusPolicy (Qt::NoFocus); this ->mSideBar->header ()->hide (); QStandardItemModel* model = new QStandardItemModel (this ->mSideBar); for (int i = 0 ; i < 5 ; i++){ QList<QStandardItem*> items1; QStandardItem* item1 = new QStandardItem (QString::number (i)); QStandardItem* item2 = new QStandardItem (QStringLiteral ("一级节点" )); items1.append (item1); items1.append (item2); model->appendRow (items1); for (int j = 0 ; j < 5 ; j++) { QList<QStandardItem*> items2; QStandardItem* item3 = new QStandardItem (QString::number (j)); QStandardItem* item4 = new QStandardItem (QStringLiteral ("二级节点" )); items2.append (item3); items2.append (item4); item1->appendRow (items2); for (int k = 0 ; k < 5 ; k++) { QList<QStandardItem*> items3; QStandardItem* item5 = new QStandardItem (QString::number (k)); QStandardItem* item6 = new QStandardItem (QStringLiteral ("三级节点" )); items3.append (item5); items3.append (item6); item3->appendRow (items3); } } } this ->mSideBar->setModel (model);this ->mSideBar->header ()->resizeSection (0 , 100 );this ->mSideBar->header ()->setSectionResizeMode (0 , QHeaderView::Fixed);QModelIndex rootIndex = this ->mSideBar->rootIndex (); QModelIndex selIndex = model->index (0 , 0 , rootIndex); this ->mSideBar->setCurrentIndex (selIndex);
侧边栏的内容可以看作是一个表格,也有行列的概念。
初始化侧边栏 侧边栏包含两个对象:视图和模型。因此需要通过两个变量来管理,由于在之前定义好了视图变量mSideBar,因此在这部分补充另一个变量mSideBarModel。
1
2
QTreeView* mSideBar; QStandardItemModel* mSideBarModel;
创建成员函数initSidebar()来初始化侧边栏:
1
2
3
4
5
6
7
8
9
10
11
12
13
14
15
16
void KvImage::initSidebar () this ->mSideBar->setEditTriggers (QTreeView::NoEditTriggers); this ->mSideBar->setSelectionBehavior (QTreeView::SelectRows); this ->mSideBar->setSelectionMode (QTreeView::SingleSelection); this ->mSideBar->setAlternatingRowColors (true ); this ->mSideBar->setFocusPolicy (Qt::NoFocus); this ->mSideBar->header ()->hide (); this ->mSideBarModel = new QStandardItemModel (this ->mSideBar); this ->mSideBar->setModel (this ->mSideBarModel); }
显示文件夹下所有图片 创建一个类ImageDir用来存放文件夹名称及图片路径,同时暴露一些函数接口用于获取图片数量、图片信息:
ImageDir.h
1 2 3 4 5 6 7 8 9 10 11 12 13 14 15 16 17 18 19 20 21 #pragma once #include <QDir> #include <QString> #include <QStringList> #include <QFileInfoList> #include <QList> class ImageDir { ImageDir (QString dirPath, QStringList filters = { "*.jpg" , "*.png" , "*.jpeg" , "*.tif" , "*.bmp" }); QList<QString> getImageNameList () ; QList<QString> getImagePathList () ; int imageNum () QString dirPath () ; QString dirName () ; private : QString mDirPath; QFileInfoList mImageList; };
ImageDir.cpp
1 2 3 4 5 6 7 8 9 10 11 12 13 14 15 16 17 18 19 20 21 22 23 24 25 26 27 28 29 30 31 32 33 34 35 36 37 38 39 40 41 42 43 44 45 46 47 48 49 50 51 52 53 54 55 56 57 58 59 60 61 62 63 64 65 #include "ImageDir.h" ImageDir::ImageDir (QString dirPath, QStringList filters) { this ->mDirPath = dirPath; QDir* dir = new QDir (dirPath); this ->mImageList = dir->entryInfoList (filters); } QList<QString> ImageDir::getImageNameList () if (this ->mDirPath.isEmpty () || this ->mImageList.isEmpty ()) { return QList <QString>(); } QList<QString> nameList; for (int i = 0 ; i < this ->mImageList.size (); i++) { nameList << this ->mImageList.at (i).fileName (); } return nameList; } QList<QString> ImageDir::getImagePathList () if (this ->mDirPath.isEmpty () || this ->mImageList.isEmpty ()) { return QList <QString>(); } QList<QString> pathList; for (int i = 0 ; i < this ->mImageList.size (); i++) { pathList << this ->mImageList.at (i).absoluteFilePath (); } return pathList; } int ImageDir::imageNum () if (this ->mDirPath.isEmpty () || this ->mImageList.isEmpty ()) { return 0 ; } return this ->mImageList.size (); } QString ImageDir::dirPath () return this ->mDirPath; } QString ImageDir::dirName () QStringList dirPathSplitList = this ->mDirPath.split ("/" ); if (dirPathSplitList.size () == 0 ) { return QString (); } return dirPathSplitList.last (); }
在KvImage.cpp中引入ImageDir类(#include "ImageDir.h"),并添加变量存放图像文件夹(QList<ImageDir> mImgDirList;)
在Qt Designer中添加动作action_open_directory,打开文件夹。在KvImage类中添加其响应函数:
1
2
3
4
5
6
7
8
9
10
11
12
13
14
15
16
17
18
19
20
21
22
void KvImage::on_action_open_directory_triggered () QString dirPath = QFileDialog::getExistingDirectory (this , QString::fromLocal8Bit ("打开文件夹" )); if (dirPath.isEmpty ()) { qWarning () << QString::fromLocal8Bit ("KvImage::on_action_open_directory_triggered() - 未选择文件夹" ); return ; } for (int i = 0 ; i < this ->mImgDirList.size (); i++) { if (dirPath == this ->mImgDirList[i].dirPath ()) { qWarning () << QString::fromLocal8Bit ("%1 已打开" ).arg (dirPath); return ; } } this ->mImgDirList.append (ImageDir (dirPath)); }
添加函数refreshSidebar,根据成员变量mImgDirList刷新侧边栏:
1
2
3
4
5
6
7
8
9
10
11
12
13
14
15
16
17
18
19
20
21
22
23
24
25
26
void KvImage::refreshSidebar (QList<ImageDir>& imgDirList) if (!this ->mSideBarModel) { this ->initSidebar (); } int i; for (i = 0 ; i < imgDirList.size (); i++) { QStandardItem* dirItem = new QStandardItem (imgDirList[i].dirName ()); this ->mSideBarModel->appendRow (dirItem); QStringList imgNameList = imgDirList[i].getImageNameList (); for (int j = 0 ; j < imgNameList.size (); j++) { dirItem->appendRow (new QStandardItem (imgNameList.at (j))); } } QModelIndex rootIndex = this ->mSideBar->rootIndex (); QModelIndex lastRowIndex = this ->mSideBarModel->index (i - 1 , 0 , rootIndex); this ->mSideBar->expand (lastRowIndex); }
其中,通过rootIndex()获取到根节点的索引,再根据根节点从模型中计算出位于i-1行0列的索引,即最新打开的文件夹索引,将其自动展开。
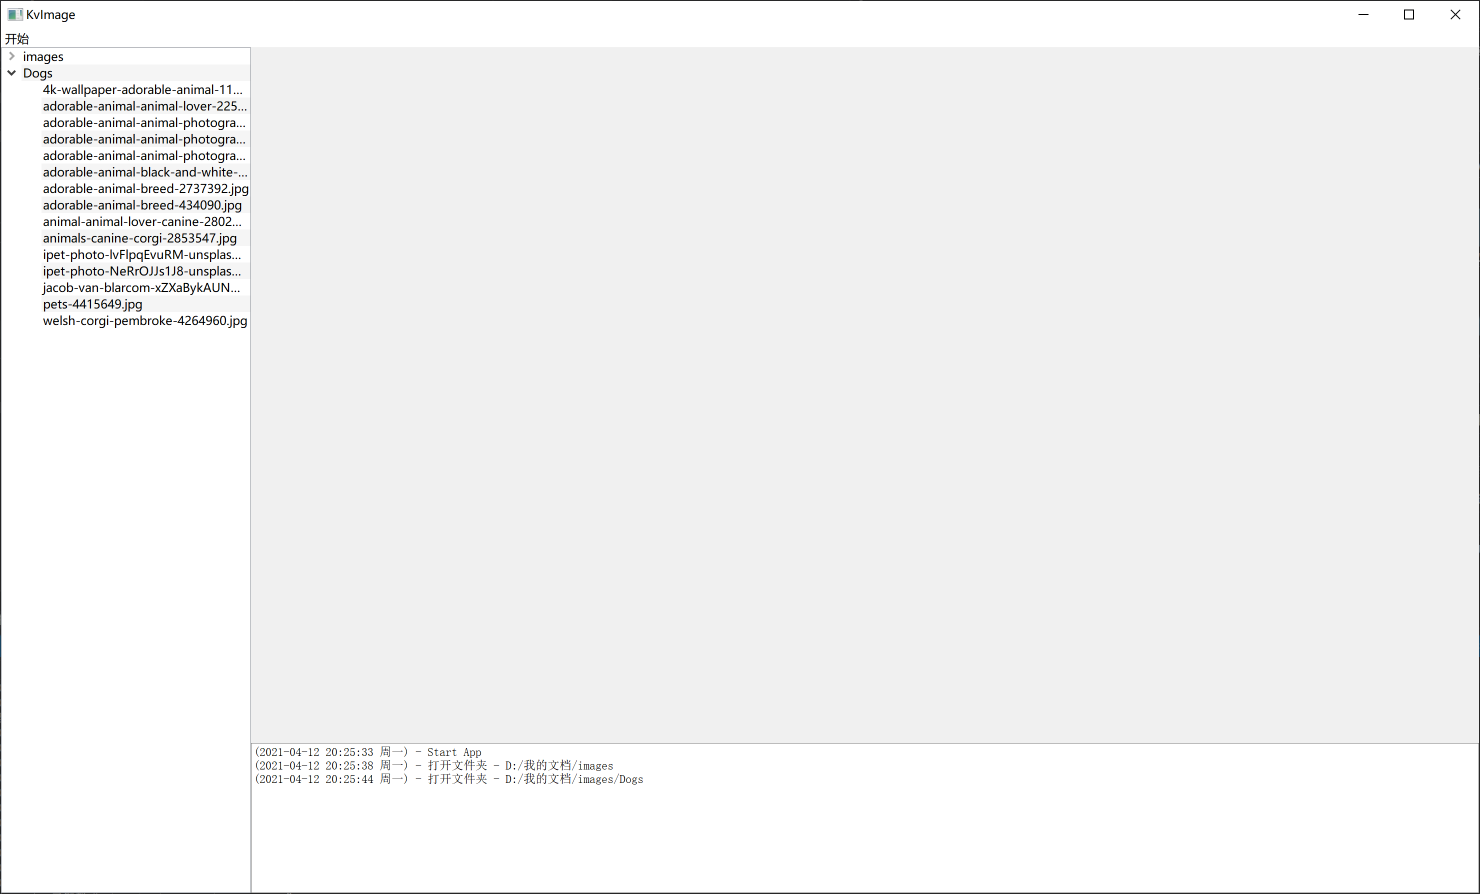
最后在打开文件夹的响应函数最后添加上如下代码,即可实现打开文件夹显示其所有图像文件到侧边栏的功能了。
1
2
3
4
5
6
7
8
void KvImage::on_action_open_directory_triggered () this ->mImgDirList.append (ImageDir (dirPath)); this ->refreshSidebar (this ->mImgDirList); this ->putText (QString::fromLocal8Bit ("打开文件夹 - %1" ).arg (dirPath)); }
侧边栏的点击事件
QTreeView使用总结5,选中信号处理
将图片文件夹加载进来,下一步希望的是点击图片列表的名称后,自动在图片窗口中显示图片。QTreeView的内容由QItemSelectionModel 管理,通过接口函数selectionModel() 可以获得这个对象的指针。该对象提供了一些信号 :
1
2
3
4
5
void currentChanged (const QModelIndex ¤t, const QModelIndex &previous) void currentColumnChanged (const QModelIndex ¤t, const QModelIndex &previous) void currentRowChanged (const QModelIndex ¤t, const QModelIndex &previous) void modelChanged (QAbstractItemModel *model) void selectionChanged (const QItemSelection &selected, const QItemSelection &deselected)
其中,currentChanged处理单个元素,区分行列;currentColumnChanged仅区分列;currentRowChanged仅区分行;selectionChanged可以处理多选的情况。在图片列表中,一个图片占一行,因此用currentRowChanged即可满足需求。
设定处理选中的槽函数:
1 void onImageSelectChanged (const QModelIndex& curIdx, const QModelIndex& preIdx)
绑定信号和槽:
1 2 3 4 5 6 KvImage::KvImage (QWidget* parent) : QMainWindow (parent) { connect (this ->mSideBar->selectionModel (), &QItemSelectionModel::currentRowChanged, this , &KvImage::onImageSelectChanged); }
在槽函数中,根据传回来的行信号取得图片信息,再查询图片文件夹列表获取图片的完整路径,最后调用iViewer->openImage()打开图像并显示。槽函数的实现如下所示:
1
2
3
4
5
6
7
8
9
10
11
12
13
14
15
16
17
18
19
void KvImage::onImageSelectChanged (const QModelIndex& curIdx, const QModelIndex& preIdx) QModelIndex parentIdx = curIdx.parent (); if (!parentIdx.isValid ()) { return ; } QStandardItem* item = ((QStandardItemModel*)this ->mSideBar->model ())->itemFromIndex (curIdx); QString imgPath = QString ("%1/%2" ) .arg (this ->mImgDirList[parentIdx.row ()].dirPath ()) .arg (item->text ()); qDebug () << QString::fromLocal8Bit ("KvImage::onImageSelectChanged() - 选择图像: %1" ) .arg (imgPath); this ->iViewer->openImage (imgPath); }
底部信息栏 底部信息栏用的是QTextBrowser,其实主要调用的接口都继承于QTextEdit,用哪一个都行,在这里作为文字输出控件来说没太大影响。
在窗体的构造函数中设置信息栏允许打开外部链接:在输出HTML文本的a标签时,可以直接打开(不过暂不支持链接包含中文,考虑自己写一个类来覆盖原有事件anchorClicked )
1 this ->mInfoBar->setOpenExternalLinks (true );
在打开图像按钮事件函数中添加输出到信息栏的功能:
1
2
3
4
5
6
7
void KvImage::on_action_open_image_triggered () this ->iViewer->openImage (fileName); this ->mInfoBar->textCursor ().insertText ( QString::fromLocal8Bit ("打开图像:%1\n" ).arg (fileName)); }
添加文字通过操作QTextBrowser的textCursor来实现,文档 。
甚至可以直接插入图像:
1 this ->mInfoBar->textCursor ().insertImage (fileName);
还是很不错的!
封装成一个函数:
1
2
3
4
5
6
7
8
9
10
void KvImage::putText (QString txt) if (!this ->mInfoBar) return ; QString logStr = QString ("(%1) - %2\n" ) .arg (QDateTime::currentDateTime ().toString ("yyyy-MM-dd hh:mm:ss ddd" )) .arg (txt); this ->mInfoBar->textCursor ().insertText (logStr); }