0%

从1到2:添加绘图、缩放、表格操作等内容

  1. 修改QAction
    1. 获取action
    2. 获取&修改文字
    3. 设置是否可选
    4. 遍历一个QMenu下的所有QAction
  2. 鼠标滚轮事件
    1. 判断当前按钮
    2. 缩放控制
  3. 矢量绘图功能
    1. 存储绘图图形数据的变量
    2. 类接口:启动和关闭绘图
    3. 静态函数:在图像上绘制图形
    4. 图形绘制后触发的事件
    5. 在图像窗口显示带矢量图形的图片
    6. 绘图的关键:鼠标事件
    7. 在父组件响应事件
    8. 删除矢量
  4. QTextBrowser滚动到底部
  5. 矢量窗口
    1. 创建类
    2. 设置窗体类
    3. 使用按钮控件控制窗体最前
    4. 使用表格
    5. 表格初始化
    6. 表格内容操作:不同数据显示的初始化,填充,清空,滚动
    7. 表格事件
    8. 表格内的操作按钮
      1. 创建按钮
      2. 获取行号:使用sender()函数
    9. 右键点击操作

KvImage-v3.0

修改QAction

在代码中控制界面菜单的QAction内容,如替换文字、设置可选、设置样式等。

获取action

通过ui.[action_name]获取,如:ui.action_open_image

获取&修改文字

1
2
this->ui.action_open_image->text();
this->ui.action_open_image->setText(QString::fromLocal8Bit("哈哈哈"));

设置是否可选

1
this->ui.action_open_image->setEnabled(false);

遍历一个QMenu下的所有QAction

1
2
3
4
5
6
7
8
foreach(QAction * action, this->ui.menu_2->actions())
{
if (action->isSeparator()) continue;

if (action == this->ui.action_draw_point) continue;

action->setEnabled(true);
}

鼠标滚轮事件

判断当前按钮

1
2
3
4
5
6
7
8
void ImageViewer::wheelEvent(QWheelEvent* evt)
{
// 如果当前按下的按钮是鼠标左键
if (evt->buttons() & Qt::LeftButton)
{
// TODO...
}
}

缩放控制

应对两种情况:缩放过小和放大过大,进行了两个控制

  1. 缩小时不允许小于某个窗口比例(例如0.5)。缩小过小时,长宽均小于比例时,按矩形与窗口对应边的比例较大的那个来。例如矩形长比窗口长为0.3,宽之比为0.5,那么以宽为主;否则反之。
  2. 放大时显示窗口映射到原图范围不大于某个像素值(例如100像素)。放大过大时,显示区映射到图像上矩形长宽任意一个小于限定值时,需要进行拉伸,保证大于限定值。例如,放大后显示区矩形映射到图像上宽度为90,高度为80,限定值为100,那么要求两个都大于100。调整后显示区高度应该为100,宽度为112.5,保证都大于限定值。
1
2
3
4
5
// 变量
private:
QLabel* mLabel;
cv::Mat mImg;
cv::Rect mRect;
1
2
3
4
5
6
7
8
9
10
11
12
13
14
15
16
17
18
19
20
21
22
23
24
25
26
27
28
29
30
31
32
33
34
35
36
37
38
39
40
41
42
43
44
45
46
47
48
49
50
51
52
53
54
55
56
57
58
59
60
61
62
63
64
65
66
67
68
void ImageViewer::wheelEvent(QWheelEvent* evt)
{
// 接收事件,不往下传递
evt->accept();
if (this->mImg.data)
{
qDebug() << "angleDelta: " << evt->angleDelta().y(); // angleDelta: QPoint(0,120)

QPointF pt = evt->posF(); // 鼠标中心点
double delta = 0.1; // 缩放系数
delta *= double(evt->angleDelta().y()) / 8 / 15; // 向上滚为正,放大;向下滚为负,缩小

int winHeight, winWidth;
cv::Rect nRect;
double imgMinZoomRatio = 0.5; // 最小缩小到原来的几倍
double imgMaxZoomPx = 100; // 最大放大到多少像素
double x0 = pt.x(), // 鼠标窗口坐标
y0 = pt.y(),
x1 = double(this->mRect.x), // 矩形左上角
y1 = double(this->mRect.y);
winHeight = this->mLabel->height();
winWidth = this->mLabel->width();
// 先计算目标区域图像矩形
nRect.width = cvRound(double(this->mRect.width) * (1 + delta));
nRect.height = cvRound(double(this->mRect.height) * (1 + delta));
nRect.x = cvRound(x0 + (x1 - x0) * (1 + delta));
nRect.y = cvRound(y0 + (y1 - y0) * (1 + delta));
// 根据计算结果优化矩形
// 1. 缩小过小时,长宽均小于比例时,按矩形与窗口对应边的比例较大的那个来。
// 例如矩形长比窗口长为0.3,宽之比为0.5,那么以宽为主;否则反之。
double imgRectWidthZoomRatio = double(nRect.width) / double(winWidth);
double imgRectHeightZoomRatio = double(nRect.height) / double(winHeight);
if (imgRectWidthZoomRatio < imgMinZoomRatio && imgRectHeightZoomRatio < imgMinZoomRatio)
{
if (imgRectWidthZoomRatio >= imgRectHeightZoomRatio)
{
delta = double(winWidth) * imgMinZoomRatio / double(this->mRect.width) - 1;
}
else delta = double(winHeight) * imgMinZoomRatio / double(this->mRect.height) - 1;

nRect.width = cvRound(double(this->mRect.width) * (1 + delta));
nRect.height = cvRound(double(this->mRect.height) * (1 + delta));
nRect.x = winWidth / 2 - nRect.width / 2;
nRect.y = winHeight / 2 - nRect.height / 2;
}
// 2. 放大过大时,显示区映射到图像上矩形长宽任意一个小于限定值时,需要进行拉伸,保证大于限定值
// 例如,放大后显示区矩形映射到图像上宽度为90,高度为80,限定值为100,那么要求两个都大于100
// 调整后显示区高度应该为100,宽度为112.5,保证都大于限定值
double imgRectRawImageWidth = double(winWidth) / double(nRect.width) * double(this->mImg.cols);
double imgRectRawImageHeight = double(winHeight) / double(nRect.height) * double(this->mImg.rows);
if (imgRectRawImageWidth < imgMaxZoomPx || imgRectRawImageHeight < imgMaxZoomPx)
{
double zoomRatio;
if (imgRectRawImageWidth <= imgRectRawImageHeight)
{
zoomRatio = imgRectRawImageWidth / imgMaxZoomPx;
} else zoomRatio = imgRectRawImageHeight / imgMaxZoomPx;

nRect.width = double(nRect.width) * zoomRatio;
nRect.height = double(nRect.height) * zoomRatio;
nRect.x = cvRound(x0 + (nRect.x - x0) * (zoomRatio));
nRect.y = cvRound(y0 + (nRect.y - y0) * (zoomRatio));
}

if (this->mRect == nRect) return;
this->mRect = nRect;
}
}

矢量绘图功能

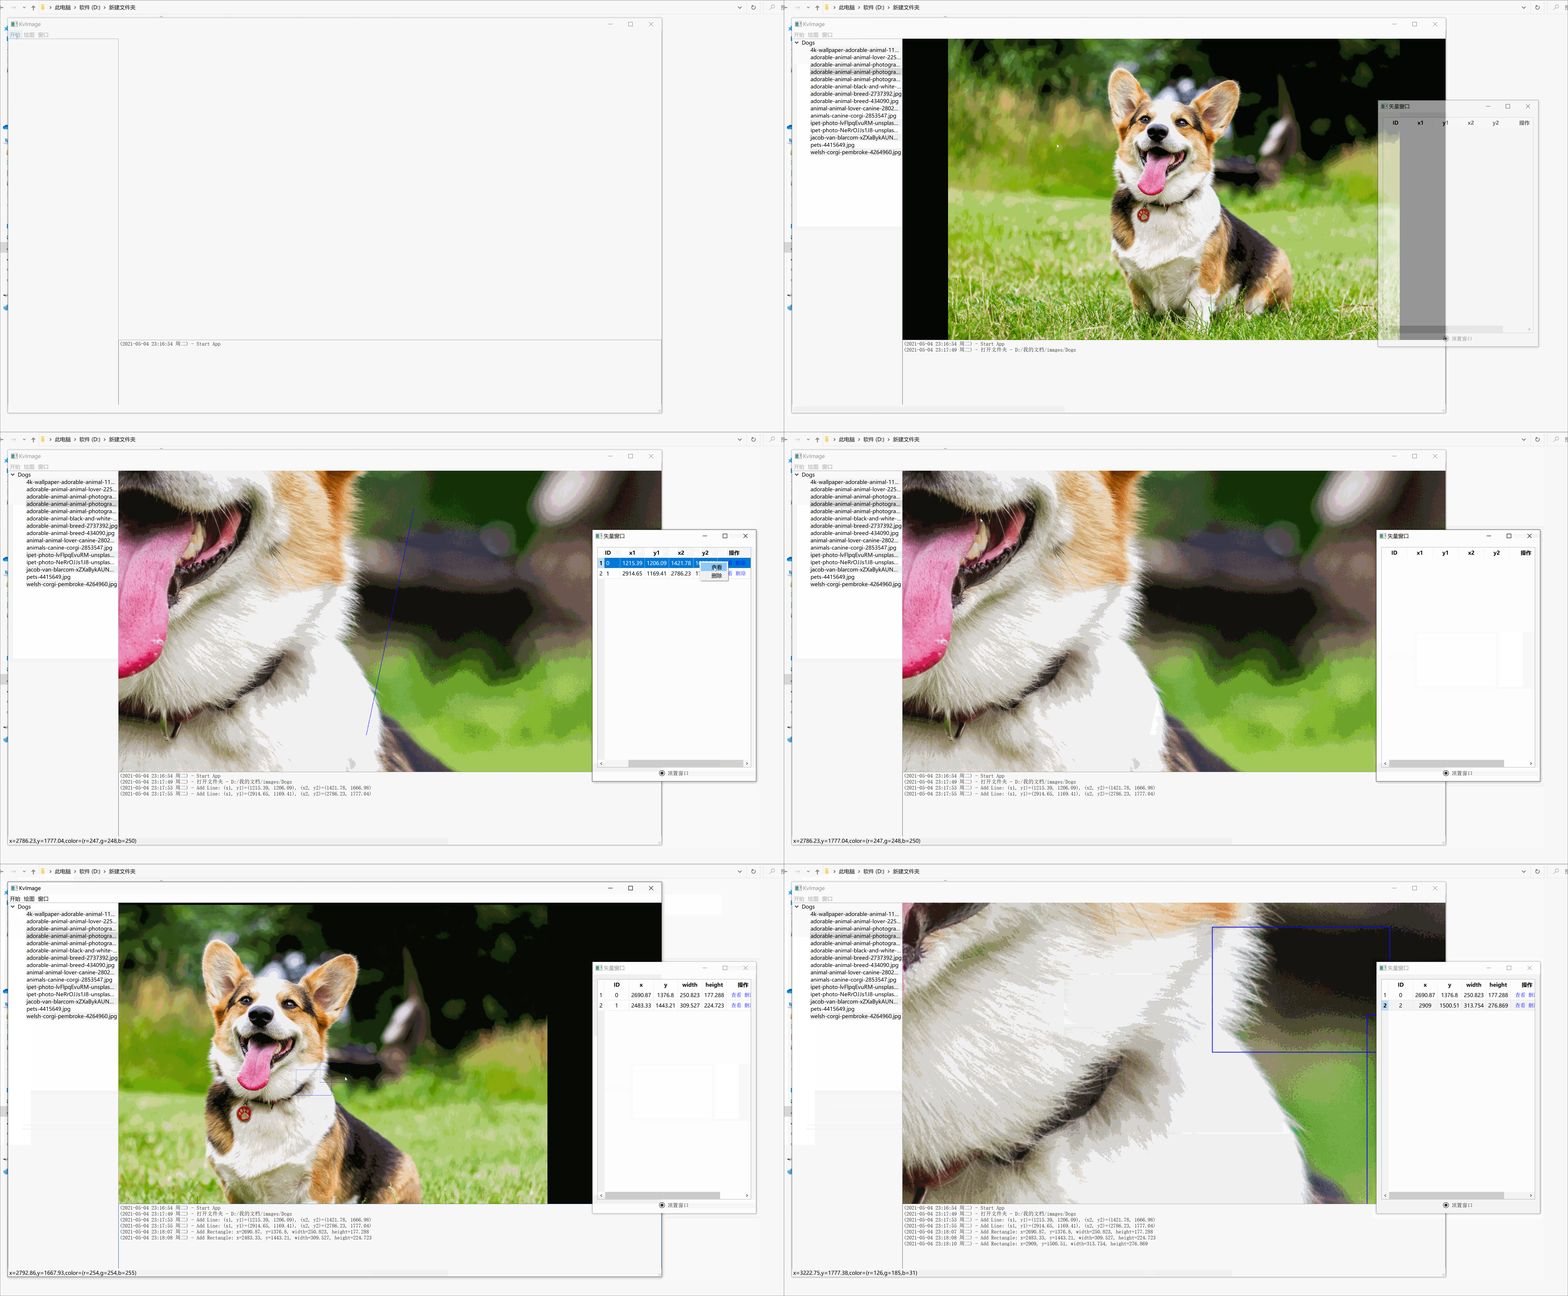
针对视图类ImageViewer添加绘图功能。绘图功能包括:画点、画线、画矩形、画旋转矩形等。自由涂鸦暂不考虑。

存储绘图图形数据的变量

存放在视图类中的几何图形数据主要用来显示,不设计过多的存储机制。

注意这里的mImgStartX等变量专门用来存储鼠标移动的点在图像上的坐标。

1
2
3
4
5
6
7
8
9
10
11
double mImgStartX, mImgStartY, mImgEndX, mImgEndY;  // 用于记录起止点在图像上的坐标

bool isDrawPoint,
isDrawLine,
isDrawRectangle,
isDrawRotateRectangle;

std::vector<cv::Point2d> mPts;
std::vector<cv::Vec4d> mLines;
std::vector<cv::Rect2d> mRects;
std::vector<RotRect2D> mRotRects;

类接口:启动和关闭绘图

视图类初始化后,通过这两个函数启动关闭其绘图功能。

1
2
3
4
5
6
7
8
9
10
11
12
13
14
void ImageViewer::startDrawPoint()
{
if (!this->isDrawing())
{
this->isDrawPoint = true;
this->mPts.clear();
}
}

void ImageViewer::stopDrawPoint()
{
this->isDrawPoint = false;
this->showImage(this->mImg, this->mRect);
}

静态函数:在图像上绘制图形

1
2
3
4
5
/*在img上绘制各种图形*/
static void drawPoint(cv::Mat& img, const cv::Point2d& pt, const cv::Scalar& color = cv::Scalar(255, 0, 0), const double crossLength = 10.0, const double lineWidth = 1.0);
static void drawLine(cv::Mat& img, const cv::Vec4d& line, const cv::Scalar& color = cv::Scalar(255, 0, 0), const double lineWidth = 1.0);
static void drawRectangle(cv::Mat& img, const cv::Rect2d& rect, const cv::Scalar& color = cv::Scalar(255, 0, 0), const double lineWidth = 1.0);
static void drawRotateRectangle(cv::Mat& img, const RotRect2D& rotRect, const cv::Scalar& color = cv::Scalar(255, 0, 0), const double lineWidth = 1.0);

图形绘制后触发的事件

1
2
3
4
5
6
signals:
// ...
void drawNewPoint(const cv::Point2d& pt);
void drawNewLine(const cv::Vec4d& line);
void drawNewRectangle(const cv::Rect2d& rect);
void drawNewRotateRectangle(const RotRect2D& rotRect);

在图像窗口显示带矢量图形的图片

1
2
3
4
5
/*显示带有矢量图形的图片,适量坐标均为图像坐标,绘制后调用showImage()*/
void showImageWithPoints(const cv::Mat& img, const cv::Rect& imgRect, const std::vector<cv::Point2d>& pts, const cv::Scalar& pointColor = cv::Scalar(255, 0, 0));
void showImageWithLines(const cv::Mat& img, const cv::Rect& imgRect, const std::vector<cv::Vec4d>& lines, const cv::Scalar& lineColor = cv::Scalar(255, 0, 0));
void showImageWithRectangles(const cv::Mat& img, const cv::Rect& imgRect, const std::vector<cv::Rect2d>& rects, const cv::Scalar& lineColor = cv::Scalar(255, 0, 0));
void showImageWithRotateRectangles(const cv::Mat& img, const cv::Rect& imgRect, const std::vector<RotRect2D>& rotRects, const cv::Scalar& lineColor = cv::Scalar(255, 0, 0));

绘图的关键:鼠标事件

鼠标按下后记录图像坐标(如果在图像内),移动时根据是否在绘图更新鼠标坐标,鼠标抬起时记录绘图结果。

1
2
3
4
5
6
7
8
9
10
11
12
13
14
15
16
17
18
19
20
21
22
23
24
25
26
27
28
29
30
31
32
33
34
35
36
37
38
39
40
41
42
43
44
45
46
47
48
49
50
51
52
53
54
55
56
57
58
59
60
61
62
63
64
65
66
67
68
69
70
71
72
73
74
75
76
77
78
79
80
81
82
83
84
85
86
87
88
89
90
91
92
93
94
95
96
97
98
99
100
101
102
103
104
105
106
107
108
109
110
111
112
113
114
115
116
117
118
119
120
121
122
123
124
125
126
127
128
129
130
131
132
133
134
135
136
137
138
139
140
141
142
143
144
145
146
147
148
149
150
151
152
153
154
155
156
157
158
159
160
161
162
163
164
165
166
167
168
169
170
171
172
173
174
175
176
177
178
179
180
181
182
183
184
185
186
187
188
189
190
191
192
193
194
195
196
197
198
199
200
201
202
203
204
205
206
207
208
209
210
211
212
213
214
215
216
217
218
219
220
221
222
223
224
void ImageViewer::mousePressEvent(QMouseEvent* evt)
{
// 接收事件,不往下传递
evt->accept();
QPointF pt = evt->localPos();
this->msX = this->meX = pt.x();
this->msY = this->meY = pt.y();
qDebug() << QString("ImageViewer::mousePressEvent() - (x=%1, y=%2)")
.arg(this->msX).arg(this->msY);

if (this->mImg.data && this->mLabel->height() > 0 && this->mLabel->width() > 0)
{
px p;
if (Calc2D::getPxFromImage(p, cv::Point(this->meX, this->meY), this->mImg, this->mRect))
{
this->mImgStartX = this->mImgEndX = p.x;
this->mImgStartY = this->mImgEndY = p.y;
emit imageMouseMoveEvent(p);

if (this->isDrawPoint)
{
cv::Mat frame = this->mImg.clone();
this->drawPoint(frame, cv::Point2d(p.x, p.y));
this->showImageWithPoints(frame, this->mRect, this->mPts);
}
else if (this->isDrawLine)
{
//
}
else if (this->isDrawRectangle)
{
//
}
else if (this->isDrawRotateRectangle)
{
//
}
}
}
}

void ImageViewer::mouseMoveEvent(QMouseEvent* evt)
{
// 接收事件,不往下传递
evt->accept();

QPointF pt = evt->localPos();
this->meX = pt.x();
this->meY = pt.y();

if (this->mImg.data && this->mLabel->height() > 0 && this->mLabel->width() > 0)
{
// 如果在绘图时取不到像素点,则退出;一般情况下取不到像素点可能是在移动图像
px p;
if (!Calc2D::getPxFromImage(p, cv::Point(this->meX, this->meY), this->mImg, this->mRect)
&& this->isDrawing())
{
return;
}

this->mImgEndX = p.x;
this->mImgEndY = p.y;
emit imageMouseMoveEvent(p);

// 绘图时窗口不变,因此不需要考虑图像矩形位置变化
if (this->isDrawPoint)
{
cv::Mat frame = this->mImg.clone();
this->drawPoint(frame, cv::Point2d(this->mImgEndX, this->mImgEndY));
this->showImageWithPoints(frame, this->mRect, this->mPts);
}
else if (this->isDrawLine)
{
cv::Mat frame = this->mImg.clone();
if (abs(this->mImgStartX - this->mImgEndX) > 1e-5 || abs(this->mImgStartY - this->mImgEndY) > 1e-5)
{
this->drawLine(frame, cv::Vec4d(this->mImgStartX, this->mImgStartY, this->mImgEndX, this->mImgEndY));
}
this->showImageWithLines(frame, this->mRect, this->mLines);
}
else if (this->isDrawRectangle)
{
cv::Mat frame = this->mImg.clone();
if (abs(this->mImgStartX - this->mImgEndX) > 1e-5 || abs(this->mImgStartY - this->mImgEndY) > 1e-5)
{
double x1, y1, x2, y2;
if (this->mImgStartX <= this->mImgEndX)
{
x1 = this->mImgStartX;
x2 = this->mImgEndX;
}
else
{
x1 = this->mImgEndX;
x2 = this->mImgStartX;
}
if (this->mImgStartY <= this->mImgEndY)
{
y1 = this->mImgStartY;
y2 = this->mImgEndY;
}
else
{
y1 = this->mImgEndY;
y2 = this->mImgStartY;
}
this->drawRectangle(frame, cv::Rect2d(x1, y1, x2 - x1, y2 - y1));
}
this->showImageWithRectangles(frame, this->mRect, this->mRects);

}
else if (this->isDrawRotateRectangle)
{
cv::Mat frame = this->mImg.clone();

if (abs(this->mImgStartX - this->mImgEndX) > 1e-5 || abs(this->mImgStartY - this->mImgEndY) > 1e-5)
{
RotRect2D rotRect(cv::Vec4d(this->mImgStartX, this->mImgStartY, this->mImgEndX, this->mImgEndY));
this->drawRotateRectangle(frame, rotRect);
}
this->showImageWithRotateRectangles(frame, this->mRect, this->mRotRects);
}
else
{
cv::Rect tRect = this->mRect;
tRect.x += (this->meX - this->msX);
tRect.y += (this->meY - this->msY);
this->showImage(this->mImg, tRect);
}
}
}

void ImageViewer::mouseReleaseEvent(QMouseEvent* evt)
{
// 接收事件,不往下传递
evt->accept();
QPointF pt = evt->localPos();
this->meX = pt.x();
this->meY = pt.y();
qDebug() << QString("ImageViewer::mouseReleaseEvent() - (x=%1, y=%2)")
.arg(this->meX).arg(this->meY);

if (this->mImg.data && this->mLabel->height() > 0 && this->mLabel->width() > 0)
{
px p;
if (!Calc2D::getPxFromImage(p, cv::Point(this->meX, this->meY), this->mImg, this->mRect))
{
return;
}

this->mImgEndX = p.x;
this->mImgEndY = p.y;
emit imageMouseMoveEvent(p);

if (this->isDrawPoint)
{
cv::Point2d nPt(this->mImgEndX, this->mImgEndY);
this->mPts.push_back(nPt);
emit drawNewPoint(nPt);
this->showImageWithPoints(this->mImg, this->mRect, this->mPts);
}
else if (this->isDrawLine)
{
if (abs(this->mImgStartX - this->mImgEndX) > 1e-5 || abs(this->mImgStartY - this->mImgEndY) > 1e-5)
{
cv::Vec4d nLine(this->mImgStartX, this->mImgStartY, this->mImgEndX, this->mImgEndY);
emit drawNewLine(nLine);
this->mLines.push_back(nLine);
}
this->showImageWithLines(this->mImg, this->mRect, this->mLines);
}
else if (this->isDrawRectangle)
{
if (abs(this->mImgStartX - this->mImgEndX) > 1e-5 || abs(this->mImgStartY - this->mImgEndY) > 1e-5)
{
double x1, y1, x2, y2;
if (this->mImgStartX <= this->mImgEndX)
{
x1 = this->mImgStartX;
x2 = this->mImgEndX;
}
else
{
x1 = this->mImgEndX;
x2 = this->mImgStartX;
}
if (this->mImgStartY <= this->mImgEndY)
{
y1 = this->mImgStartY;
y2 = this->mImgEndY;
}
else
{
y1 = this->mImgEndY;
y2 = this->mImgStartY;
}
cv::Rect2d nRect(x1, y1, x2 - x1, y2 - y1);
emit drawNewRectangle(nRect);
this->mRects.push_back(nRect);
}

this->showImageWithRectangles(this->mImg, this->mRect, this->mRects);
}
else if (this->isDrawRotateRectangle)
{
if (abs(this->mImgStartX - this->mImgEndX) > 1e-5 || abs(this->mImgStartY - this->mImgEndY) > 1e-5)
{
RotRect2D nRotRect(cv::Vec4d(this->mImgStartX, this->mImgStartY, this->mImgEndX, this->mImgEndY));
emit drawNewRotateRectangle(nRotRect);
this->mRotRects.push_back(nRotRect);
}
this->showImageWithRotateRectangles(this->mImg, this->mRect, this->mRotRects);
}
else
{
if (this->msX != this->meX || this->msY != this->meY)
{
this->mRect.x += (this->meX - this->msX);
this->mRect.y += (this->meY - this->msY);
this->showImage(this->mImg, this->mRect);
}
}
}
}

在父组件响应事件

1
2
3
4
5
6
private slots:
// ...
void onDrawNewPoint(const cv::Point2d& pt);
void onDrawNewLine(const cv::Vec4d& line);
void onDrawNewRectangle(const cv::Rect2d& rect);
void onDrawNewRotateRectangle(const RotRect2D& rotRect);

绑定事件

1
2
3
4
connect(this->iViewer, SIGNAL(drawNewPoint(const cv::Point2d&)), this, SLOT(onDrawNewPoint(const cv::Point2d&)));
connect(this->iViewer, SIGNAL(drawNewLine(const cv::Vec4d &)), this, SLOT(onDrawNewLine(const cv::Vec4d&)));
connect(this->iViewer, SIGNAL(drawNewRectangle(const cv::Rect2d &)), this, SLOT(onDrawNewRectangle(const cv::Rect2d &)));
connect(this->iViewer, SIGNAL(drawNewRotateRectangle(const RotRect2D &)), this, SLOT(onDrawNewRotateRectangle(const RotRect2D &)));

事件

1
2
3
4
5
6
7
8
9
10
11
12
13
14
15
16
17
18
19
20
21
22
23
24
25
26
27
void KvImage::onDrawNewPoint(const cv::Point2d& pt)
{
this->putText(QString("Add Point: x=%1, y=%2").arg(pt.x).arg(pt.y));
}

void KvImage::onDrawNewLine(const cv::Vec4d& line)
{
this->putText(QString("Add Line: (x1, y1)=(%1, %2), (x2, y2)=(%3, %4)")
.arg(line[0]).arg(line[1])
.arg(line[2]).arg(line[3]));
}

void KvImage::onDrawNewRectangle(const cv::Rect2d& rect)
{
this->putText(QString("Add Rectangle: x=%1, y=%2, width=%3, height=%4")
.arg(rect.x).arg(rect.y)
.arg(rect.width).arg(rect.height));
}

void KvImage::onDrawNewRotateRectangle(const RotRect2D& rotRect)
{
this->putText(QString("Add Rotate Rectangle: (x1, y1)=(%1, %2), (x2, y2)=(%3, %4), (x3, y3)=(%5, %6), (x4, y4)=(%7, %8)")
.arg(rotRect.pt1().x).arg(rotRect.pt1().y)
.arg(rotRect.pt2().x).arg(rotRect.pt2().y)
.arg(rotRect.pt3().x).arg(rotRect.pt3().y)
.arg(rotRect.pt4().x).arg(rotRect.pt4().y));
}

删除矢量

声明

1
2
3
4
bool deletePoint(const cv::Point2d& pt);
bool deleteLine(const cv::Vec4d& line);
bool deleteRectangle(const cv::Rect2d& rect);
bool deleteRotateRectangle(const RotRect2D& rotRect);

实现

1
2
3
4
5
6
7
8
9
10
11
12
bool ImageViewer::deletePoint(const cv::Point2d& pt)
{
std::vector<cv::Point2d>::iterator pos = std::find(this->mPts.begin(), this->mPts.end(), pt);
if (pos == this->mPts.end())
{
return false;
}
this->mPts.erase(pos);
return true;
}

//// 其余类似

QTextBrowser滚动到底部

继承自QTextEdit::moveCursor(QTextCursor::MoveOperation operation, QTextCursor::MoveMode mode = QTextCursor::MoveAnchor)

移动操作参考QTextCursor::MoveOperation-enum

1
this->mInfoBar->moveCursor(QTextCursor::End);  // 滚动到底部

矢量窗口

用来显示矢量(点线面),并具有选择查看和导出保存的功能。

创建类

VectorWindow.h

1
2
3
4
5
6
7
8
9
10
11
#pragma once
#include <QWidget>

class VectorWindow :
public QWidget
{
Q_OBJECT

public:
VectorWindow(QWidget* parent = Q_NULLPTR);
};

VectorWindow.cpp

1
2
3
4
#include "VectorWindow.h"

VectorWindow::VectorWindow(QWidget* parent) : QWidget(parent)
{ }

设置窗体类

1
2
3
4
5
6
7
8
9
10
11
12
13
14
15
16
17
18
19
20
////////// 初始化窗口
// 设置窗体大小和位置
QDesktopWidget* desktopWidget = QApplication::desktop();
QRect deskRect = desktopWidget->availableGeometry(); // 可用桌面大小
int deskHeight, deskWidth;
deskHeight = deskRect.height();
deskWidth = deskRect.width();
int winHeight, winWidth;
winHeight = deskHeight * 0.5;
winWidth = deskWidth * 0.2;
int marginRight;
marginRight = 100;
this->setGeometry(deskWidth - winWidth - marginRight, deskHeight / 2 - winHeight / 2, winWidth, winHeight);

// 窗体标题
this->setWindowTitle(QString::fromLocal8Bit("矢量窗口"));

// 窗口最前
this->setWindowFlags(this->windowFlags() | Qt::WindowStaysOnTopHint);
// this->setWindowFlags(this->windowFlags() &~ Qt::WindowStaysOnTopHint); // 取消窗口最前

使用按钮控件控制窗体最前

当当前窗口为隐藏状态时,直接设置其是否顶置;若当前状态为显示,设置顶置方式后窗口会自动隐藏,因此需要额外调用一次show()函数。

创建插槽:

1
2
3
4
5
6
7
8
9
10
11
12
13
14
15
16
17
18
19
20
21
22
23
24
25
void VectorWindow::onToggleTopHint(bool checked)
{
if (checked)
{
// 窗口最前
if (!isHidden())
{
this->setWindowFlags(this->windowFlags() | Qt::WindowStaysOnTopHint);
this->show();
} else this->setWindowFlags(this->windowFlags() | Qt::WindowStaysOnTopHint);

qDebug() << QString::fromLocal8Bit("设置窗口最前");
}
else
{ // 取消窗口最前
if (!isHidden())
{
this->setWindowFlags(this->windowFlags() & ~Qt::WindowStaysOnTopHint);
this->show();
}
else this->setWindowFlags(this->windowFlags() & ~Qt::WindowStaysOnTopHint);

qDebug() << QString::fromLocal8Bit("取消窗口最前");
}
}

创建QRadioButton按钮并绑定事件:

1
2
3
4
5
6
7
// 是否顶置按钮
QRadioButton* winTopBtn = new QRadioButton(this);
winTopBtn->setText(QString::fromLocal8Bit("顶置窗口"));
QObject::connect(winTopBtn, SIGNAL(clicked(bool)), this, SLOT(onToggleTopHint(bool)));

this->mLayout->addWidget(winTopBtn, 1, 2, 1, 1); // 行,列,行宽,列宽
if (!winTopBtn->isChecked()) winTopBtn->click();

使用表格

Qt入门-表格类QTableWidget

QTableWidget继承自QTableView,功能较为齐全。下面是一个使用示例:

1
2
3
4
5
6
7
8
9
10
11
12
13
14
15
16
17
18
19
20
21
22
23
24
25
26
27
28
29
30
31
32
33
34
35
36
37
38
39
40
41
42
43
44
45
46
47
48
49
50
51
52
53
54
55
56
57
58
59
////////////// 设置表格

// 设置表格行列
this->mTable->setRowCount(4);
this->mTable->setColumnCount(2);

//设置表格行标题
QStringList headerLabels;
headerLabels << "C1" << "C2";
this->mTable->setHorizontalHeaderLabels(headerLabels);

//设置表格行标题的对齐方式
this->mTable->horizontalHeader()->setDefaultAlignment(Qt::AlignCenter);

//设置行表题
QStringList rowLabels;
rowLabels << "Line1" << "Line2" << "Line3" << "Line4";
this->mTable->setVerticalHeaderLabels(rowLabels);

// 自动调整最后一列的宽度使它和表格的右边界对齐
this->mTable->horizontalHeader()->setStretchLastSection(true);
// 设置表格宽高调整尺寸策略
this->mTable->horizontalHeader()->setSectionResizeMode(QHeaderView::ResizeMode::Stretch);
this->mTable->verticalHeader()->setSectionResizeMode(QHeaderView::ResizeMode::ResizeToContents);

//设置表格的选择方式
this->mTable->setSelectionBehavior(QAbstractItemView::SelectionBehavior::SelectRows);

//设置编辑方式
this->mTable->setEditTriggers(QAbstractItemView::EditTrigger::NoEditTriggers);

//设置表格的内容
for (int row = 0; row < 4; ++row)
{
QTableWidgetItem* item0, * item1;
item0 = new QTableWidgetItem;
item1 = new QTableWidgetItem;

QString txt = QString("%1").arg(row + 1);
item0->setText(txt);
this->mTable->setItem(row, 0, item0);

txt = QString("%1").arg((row + 1) * 2);
item1->setText(txt);
this->mTable->setItem(row, 1, item1);
}

//增加一行
this->mTable->setRowCount(5);
QTableWidgetItem* vHeader5 = new QTableWidgetItem("Line5");
this->mTable->setVerticalHeaderItem(4, vHeader5);

QTableWidgetItem* item5_0, * item5_1;
item5_0 = new QTableWidgetItem;
item5_1 = new QTableWidgetItem;
item5_0->setText(QString("%1").arg(5));
item5_1->setText(QString("%1").arg(5 * 2));
this->mTable->setItem(4, 0, item5_0);
this->mTable->setItem(4, 1, item5_1);

表格初始化

设置了一些显示参数,如标题字体样式、对齐方式、宽高策略、是否可选中项目等。

1
2
3
4
5
6
7
8
9
10
11
12
13
14
15
16
17
18
19
20
21
22
23
24
25
26
27
28
29
30
31
32
33
34
35
void VectorWindow::initTable(QTableWidget* table)
{
if (table == Q_NULLPTR)
{
if (this->mTable != Q_NULLPTR)
{
table = this->mTable;
}
else
{
qWarning() << QString::fromLocal8Bit("表格初始化失败");
return;
}
}

//设置 表格 及 行标题 的对齐方式
table->horizontalHeader()->setDefaultAlignment(Qt::AlignCenter);

// 设置加粗
QFont headerFont = table->horizontalHeader()->font();
headerFont.setBold(true);
table->horizontalHeader()->setFont(headerFont);

// 自动调整最后一列的宽度使它和表格的右边界对齐
table->horizontalHeader()->setStretchLastSection(true);
// 设置表格宽高调整尺寸策略
table->horizontalHeader()->setSectionResizeMode(QHeaderView::ResizeMode::Stretch);
table->verticalHeader()->setSectionResizeMode(QHeaderView::ResizeMode::ResizeToContents);

//设置表格的选择方式
table->setSelectionBehavior(QAbstractItemView::SelectionBehavior::SelectRows);

//设置编辑方式
table->setEditTriggers(QAbstractItemView::EditTrigger::NoEditTriggers);
}

表格内容操作:不同数据显示的初始化,填充,清空,滚动

填充数据前应该对表格进行初始化,不同的数据类型具有不同的表头信息

1
2
3
4
5
6
7
8
9
10
void VectorWindow::initShowPoints() const
{
this->clearTable();

this->mTable->setColumnCount(3); // id,x,y
QStringList rowHeaderList;
rowHeaderList << "ID" << "x" << "y";
this->mTable->setHorizontalHeaderLabels(rowHeaderList);
}
//// ...

填充一行数据:

1
2
3
4
5
6
7
8
9
10
11
12
13
14
15
16
17
18
19
20
21
22
23
24
25
26
27
28
29
30
31
32
33
34
35
36
bool VectorWindow::appendPoint(const cv::Point2d& pt) const
{
if (this->mTable == Q_NULLPTR)
{
qWarning() << QString::fromLocal8Bit("VectorWindow::appendPoint() - 表格未初始化");
return false;
}

int rowCount, colCount;
rowCount = this->mTable->rowCount();
colCount = this->mTable->columnCount();

if (colCount != 3)
{
qWarning() << QString::fromLocal8Bit("VectorWindow::appendPoint() - 列数不一致,当前为(%1),应为(%2)")
.arg(colCount).arg(3);
return false;
}

this->mTable->setRowCount(rowCount + 1);

QTableWidgetItem* idItem = new QTableWidgetItem(QString::number(rowCount));
QTableWidgetItem* xItem = new QTableWidgetItem(QString::number(pt.x));
QTableWidgetItem* yItem = new QTableWidgetItem(QString::number(pt.y));

idItem->setTextAlignment(Qt::AlignCenter);
xItem->setTextAlignment(Qt::AlignCenter);
yItem->setTextAlignment(Qt::AlignCenter);

this->mTable->setItem(rowCount, 0, idItem);
this->mTable->setItem(rowCount, 1, xItem);
this->mTable->setItem(rowCount, 2, yItem);

return true;
}
/// ...

填充列表数据直接循环调用填充单个的即可。

控制表格滚动到底部,一般在插入数据后调用

1
2
// 滚动到底部
this->mTable->scrollToBottom();

清空表格不仅要清空内容,还要把行列设置为0从而清空表头

1
2
3
4
5
6
7
8
9
10
11
12
13
void VectorWindow::clearTable() const
{
if (this->mTable == Q_NULLPTR)
{
qWarning() << QString::fromLocal8Bit("VectorWindow::clearTable() - 表格未初始化");
return;
}

// 清空表格
this->mTable->clearContents();
this->mTable->setRowCount(0);
this->mTable->setColumnCount(0);
}

表格事件

当希望点击表格中的矢量定位到矢量在图上的位置时,需要用到表格事件QTableWidget::signals,这边用到了双击事件cellDoubleClicked(int row, int col)

创建槽函数

1
2
public slots:
void onItemDoubleClicked(int row, int col);
1
2
3
4
void VectorWindow::onItemDoubleClicked(int row, int col)
{
qDebug() << row << ", " << col;
}

绑定信号

1
2
// 绑定事件
QObject::connect(this->mTable, SIGNAL(cellDoubleClicked(int, int)), this, SLOT(onItemDoubleClicked(int, int)));

表格内的操作按钮

QT表格列添加多个按钮

当希望删除矢量时,可以借助每个矢量后面的操作按钮完成。

创建按钮

1
2
3
4
5
6
7
8
9
10
11
12
13
14
15
16
17
18
19
20
21
22
23
24
25
26
27
28
QWidget* VectorWindow::createRowCtrlBtnWidget()
{
QWidget* w = new QWidget();

QPushButton* viewBtn = new QPushButton(QString::fromLocal8Bit("查看"));
QPushButton* delBtn = new QPushButton(QString::fromLocal8Bit("删除"));
QHBoxLayout* layout = new QHBoxLayout(); //添加水平布局控件
QWidget* widget = new QWidget(); //添加部件

viewBtn->setStyleSheet("QPushButton{margin:0;padding:0;color:blue;border:none;background-color:rgba(0,0,0,0);}\
QPushButton:hover{font-weight:bold;text-decoration:underline;}");
viewBtn->setCursor(Qt::PointingHandCursor);

delBtn->setStyleSheet("QPushButton{margin:0;padding:0;color:blue;border:none;background-color:rgba(0,0,0,0);}\
QPushButton:hover{font-weight:bold;text-decoration:underline;}");
delBtn->setCursor(Qt::PointingHandCursor);

QObject::connect(viewBtn, SIGNAL(clicked()), this, SLOT(onViewRow()));
QObject::connect(delBtn, SIGNAL(clicked()), this, SLOT(onRemoveRow()));

layout->addWidget(viewBtn);
layout->addWidget(delBtn);
layout->setContentsMargins(0, 0, 0, 0);
layout->setAlignment(Qt::AlignCenter);
w->setLayout(layout);

return w;
}

添加到表格中:

1
2
QWidget* btnWidget = this->createRowCtrlBtnWidget();
this->mTable->setCellWidget(rowCount, 3, btnWidget);

获取行号:使用sender()函数

Qt中QObject::sender()的用法

当某一个Objectemit一个signal的时候,它就是一个sender。系统会记录下当前是谁emit出这个signal的,所以你在对应的slot里就可以通过sender()得到当前是谁invoke了你的slot。

在如下例子中,onEditRow()函数作为表格项按钮的响应函数,其sender就是按钮本身,而按钮的父组件是添加到表格中的widget,其pos()函数的返回值是其在表格中左上角的位置坐标。因此通过表格的indexAt()函数可以反算出行号。

1
2
3
4
5
6
7
8
9
void VectorWindow::onEditRow()
{
QWidget* w = qobject_cast<QWidget*>(sender()->parent());
if (w)
{
int row = this->mTable->indexAt(w->pos()).row();
qDebug() << row;
}
}

还有一种思路是将行号作为属性(property)存放到每一行的操作按钮控件中,但是由于表格的删除操作,实际的行号可能随时发生变化,那么创建一个表格行时生成的操作按钮里记录的行号就过时了,因此不适合作为属性传入,这里采用实时计算的方式较为合适。作为属性传入的见下一节,在右键点击菜单中,菜单的生成是实时的,此时的行号具有时效性。

右键点击操作

QT实现鼠标右键快捷菜单(QTableWidget)

右键点击一个项目进行删除或者复制到剪贴板。

QTableWidget的点击事件关联的都是鼠标左键,只有customContextMenuRequested(QPoint)信号是QWidget中唯一的右键菜单点击的信号,且该信号的触发条件是QWidget的上下文菜单策略(ContextMenuPolicy)设置为Qt::CustomContextMenu

1
this->mTable->setContextMenuPolicy(Qt::CustomContextMenu);

响应事件:

1
2
3
4
5
6
7
8
9
10
11
12
13
14
15
16
17
18
19
20
21
22
23
24
25
26
27
28
29
30
void VectorWindow::onTableRightClicked(const QPoint pos)
{
qDebug() << pos;

if (this->mVecType == Kv::VectorType::None)
{
return;
}

QModelIndex idx = this->mTable->indexAt(pos);
qDebug() << idx;

if (idx.row() < 0 || idx.column() < 0)
{
return;
}

QMenu* menu = new QMenu(this->mTable);
QAction* actView = new QAction(QString::fromLocal8Bit("查看"), this->mTable);
QAction* actDel = new QAction(QString::fromLocal8Bit("删除"), this->mTable);
actView->setProperty("row", QVariant(idx.row()));
actDel->setProperty("row", QVariant(idx.row()));
QObject::connect(actView, SIGNAL(triggered()), this, SLOT(onViewRow()));
QObject::connect(actDel, SIGNAL(triggered()), this, SLOT(onRemoveRow()));

menu->addAction(actView);
menu->addAction(actDel);
menu->move(cursor().pos());
menu->show();
}

右键菜单中添加的动作与表格内按钮的动作可能用到相同的响应函数,例如矢量的查看和删除。在表格按钮中,行号的获取是通过表单控件的位置计算出来的,由于表格行数随时可能发生变化,因此通过实时计算的方式可以保证行号的正确;而在右键菜单中,其生成和消失是根据当前鼠标位置决定的,并不会和每一行数据进行绑定,因此通过属性设置行号即可完成功能。